Starting gender-affirming hormone therapy (GAHT) can come with a lot of emotions—excitement, anticipation, and maybe even some nerves. Injectable forms of GAHT (also called HRT) are available for both testosterone and estrogen. If self-injection is part of your journey, it’s completely normal to feel a little intimidated at first. Between different needle sizes, syringes, and all the medical jargon, it can feel like a lot to figure out.
But you’ve got this—and we’re here to help. This guide will break everything down in a way that makes sense so you feel confident and prepared. Whether you’re learning to read a syringe or looking for tips on safe disposal, we’ve got you covered. Remember, everyone who injects GAHT starts as a beginner. And, with time and practice, this will become second nature. Let’s dive in!
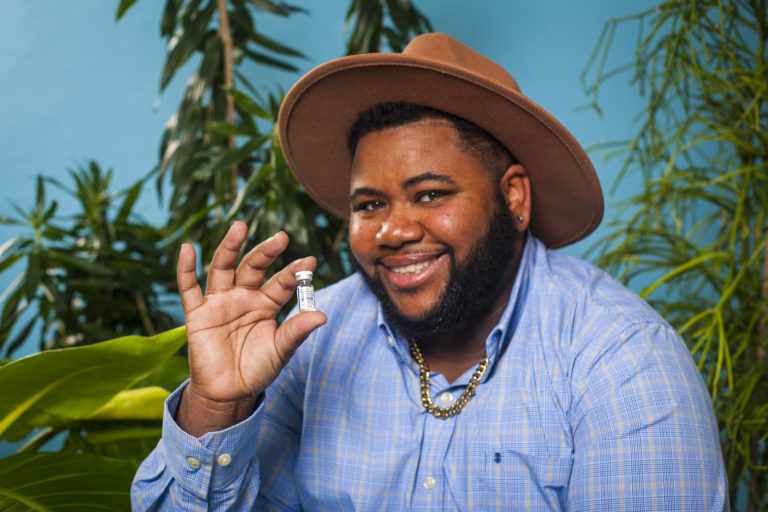
Ready to level up your gender transition?
Get gender-affirming care made by trans people, no insurance or therapy letter required.
Keep It Clean!
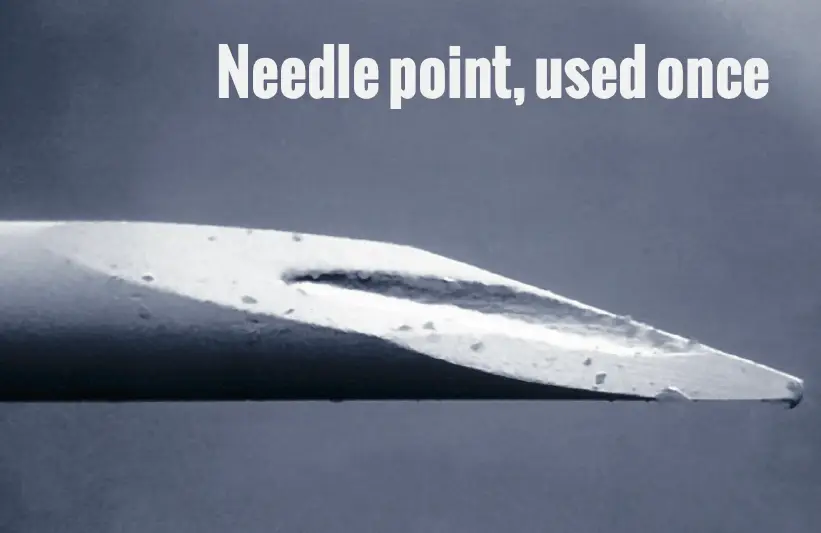
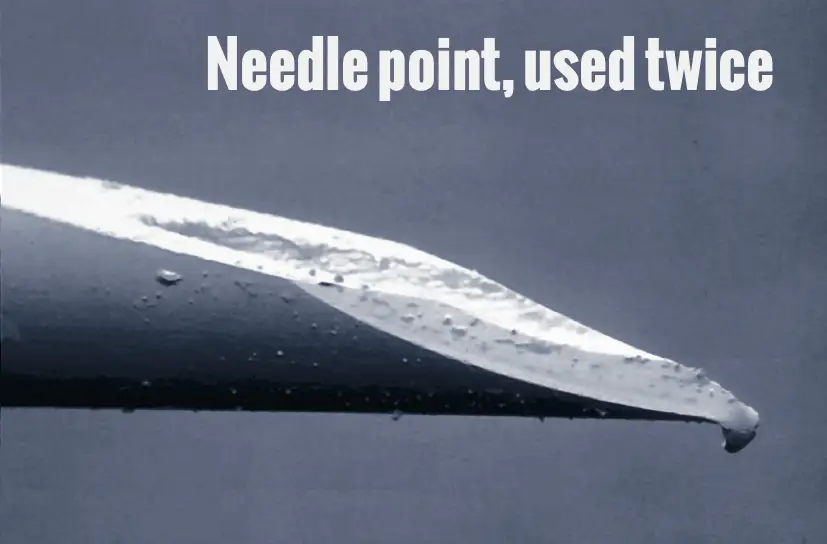
First and foremost, it is crucial to always use a fresh, unused syringe and needle every time you do your injection. Never reuse your injection supplies. Dull needles make the injection extra painful, and you risk developing an abscess or other complications. Keep it fresh and clean every time!
In addition to using fresh injection supplies for each injection, remember to disinfect the top of your vials with a fresh alcohol swab before each injection.
If you find yourself needing to use the last bit of medication from two different vials to draw up a full dose, you may alcohol-swab the top of BOTH vials and use the same drawing-up needle for each vial.


Anatomy of injection supplies
Injection supplies come in many different sizes, brands, and styles. For gender-affirming hormone therapy (GAHT, sometimes called HRT), injection supplies consist of three primary components:
- Barrel, sometimes referred to as a syringe
- draw-up needle
- Injection needle

Sometimes, your pharmacy will give you these three different components as three separate packages (syringe, draw-up needle, and injection needle). Other times, you may get it in less than three parts, such as when parts of the syringe and needle are already attached. As long as you have separate needles for drawing up and injection, how it is dispensed shouldn’t make a difference!
The needle is the part that you use to draw up your medication from the vial (using a larger draw-up needle) and also the part you use to inject yourself (using a smaller injection needle). You need two needles to inject your GAHT.
The length and gauge (g) of the draw-up needle and the injection needles are different. Each type is used for a separate step of the injection process.
Length refers to how long the needle is.
Gauge is a number that refers to how “thick” the needle is. The thicker the needle, the smaller the gauge number.
For drawing up medication, typical needle gauge sizes range from 18 to 21g. Drawing-up needle lengths range from 1 to 2 inches.
For intramuscular injections, typical needle gauge sizes range from 22 to 24g and 1 to 1.5 inches long.
For subcutaneous injections, typical gauge sizes range from 25g to 31g and are usually ⅝ of an inch long. Even though subcutaneous injections could be performed with a needle longer than ⅝ inches long, it is not ideal or necessary since you only need to insert the needle just under the skin.
The tip is where the syringe and needle attach to each other.
The needle hub is where the needles attach and detach from the syringe itself. This is important because if you are given injection supplies where the needle hubs cannot attach/detach from the syringe tips, you will not be able to use a separate needle for the drawing up and injection processes. When your injection supplies are dispensed, look at the needle hub to ensure that you have the right combination of needles and syringes to take your medication.
The barrel is the chamber inside the syringe that has measurement markings. This is where your medication will be drawn up.
The plunger, which looks like a button, is at the end of the syringe. It is used to draw up the medication and push it through the needle for the injection.
Getting the right dose: how to read syringe markings
Your prescription is written as milligrams (mg) per milliliter (ml). Milligrams refer to the amount of medicine, and milliliters refer to the amount of liquid. For example: If your provider ordered 200 mg/ml of HRT and the instructions are to inject 0.5 ml once weekly from a 1 ml vial, that means there is 200 mg worth of medication inside the entire 1 ml of liquid. But since the instructions here are to only inject half (0.5 ml), your dose would be 100 mg.
Your provider has likely prescribed you 1 ml syringes or 100 unit syringes. Other times, you may be prescribed 3 ml syringes. Sometimes, your pharmacy may not have 1 ml/100 unit syringes in stock and will offer 3 ml syringes as a substitute. Here is how to understand the markings and measure your dose on all three types of syringe:
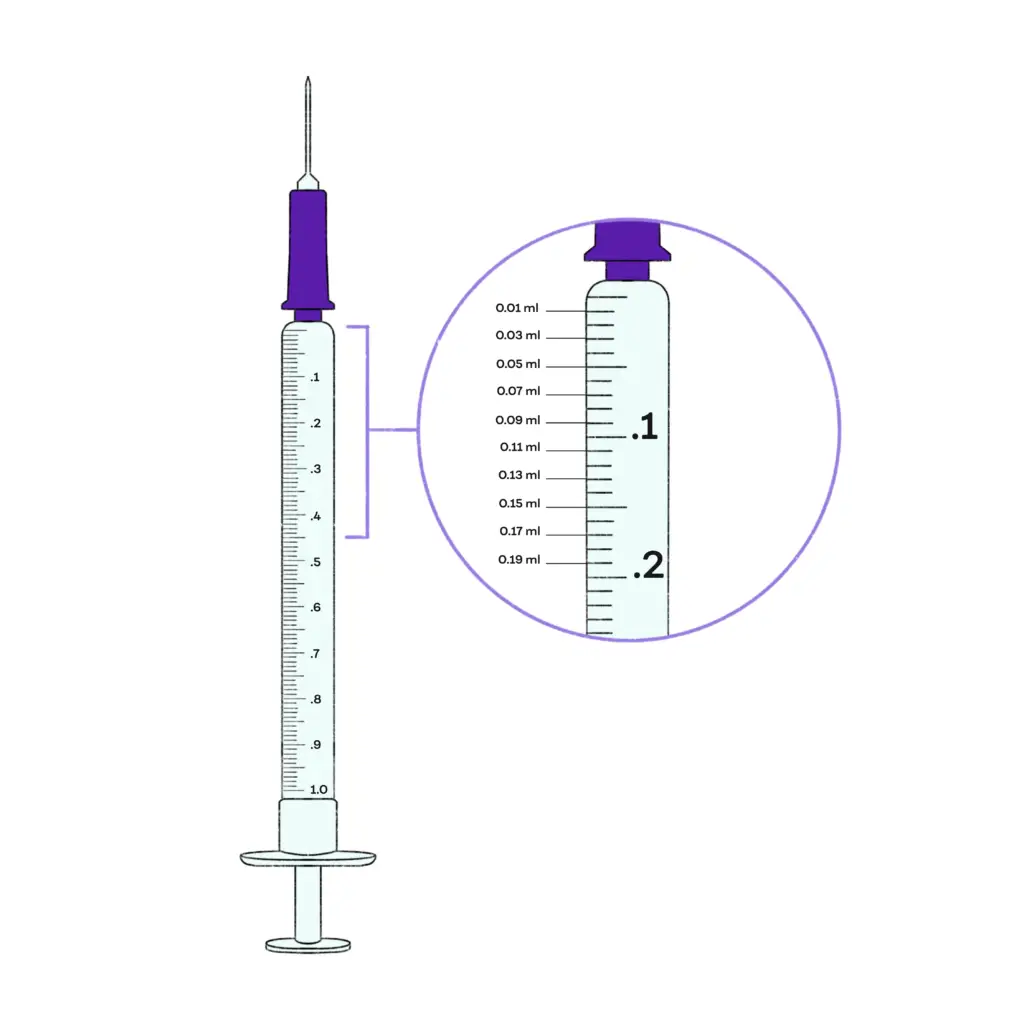
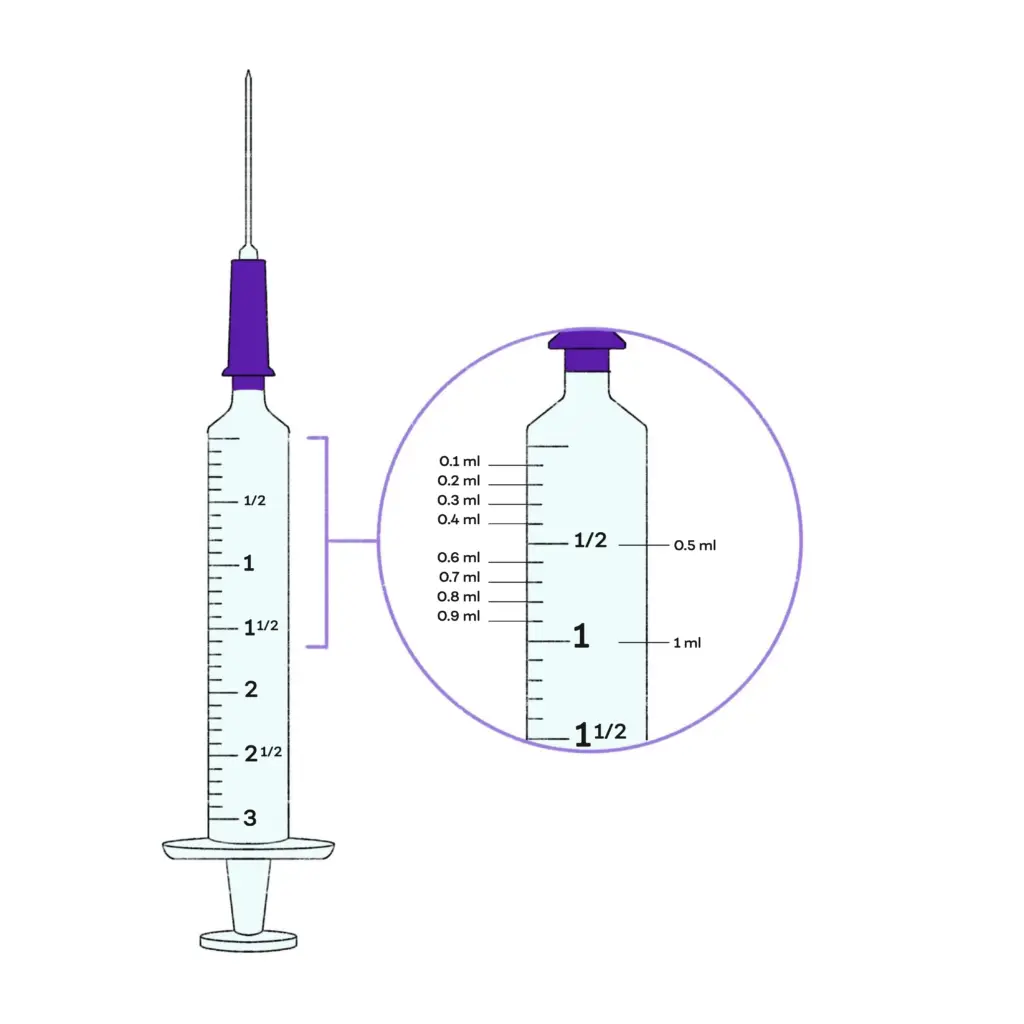
How to read a 1 ml syringe
Each line is equivalent to 0.01 ml.
Every 0.10 ml is marked with a larger line.
For example, if your dose is .35 ml, you will draw up to the halfway point line between the .3 and .4 markings.
How to read a 3 ml syringe
Each line is equivalent to 0.10 ml.
Every 0.5 ml is marked with a larger line.
For example, if your dose is .25 ml, you will draw up the medication halfway between the second line (0.2 ml) and the third line (0.3 ml) to draw up approximately 0.25 ml.
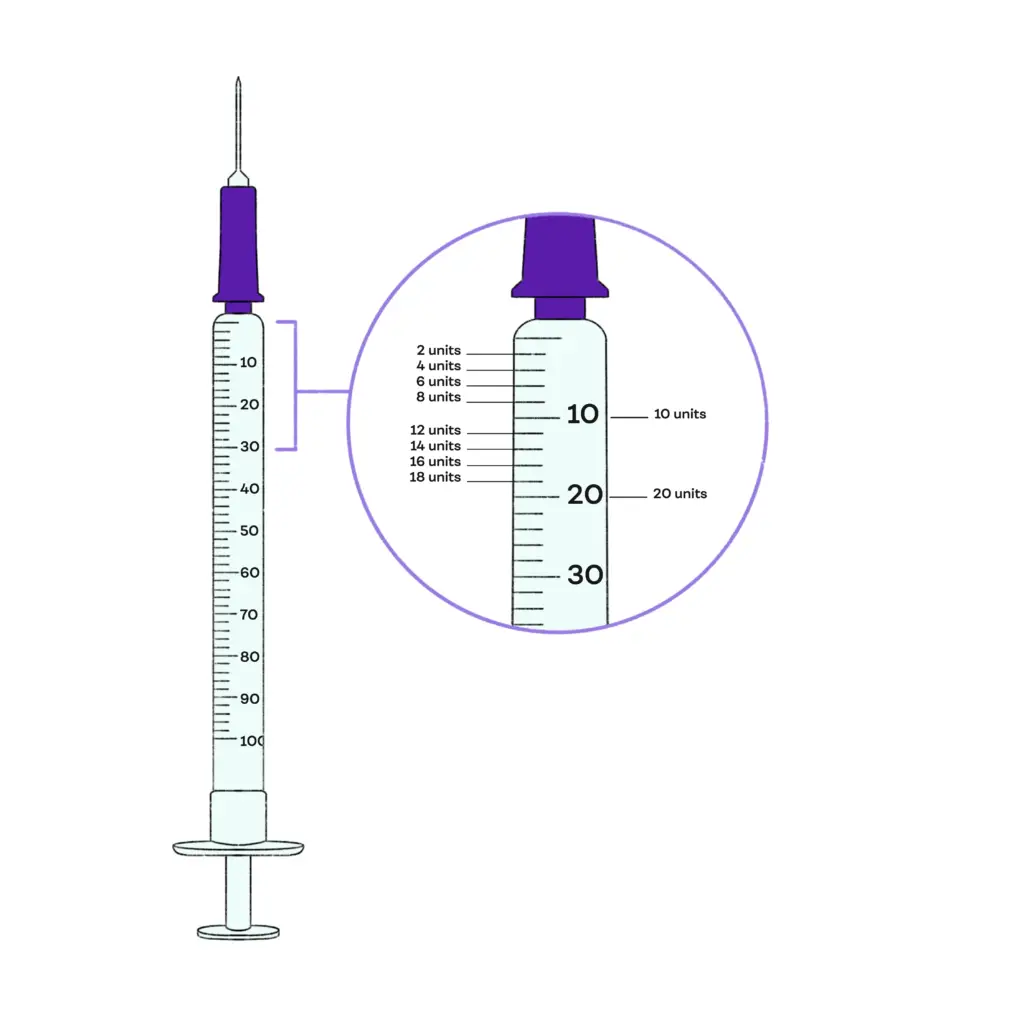
How to read syringes measured in “units” instead of ml
100 units is equal to 1 ml. Each line is equivalent to 2 units, or 0.02 ml.
Every 10 units is marked with a larger line equivalent to .1 ml.
For example, if your dose is .4 ml, you will draw up to 40 units.
Watch Our Injection Tutorial
Need to see the process in action? Our very own Plume Co-founder and Chief Medical Officer, Dr. Jerrica Kirkley, walks you through both intramuscular and subcutaneous injections in our tutorial video. Check it out!
Buying injection supplies online
Did you know you can buy injection supplies online without a prescription in most states? Sometimes, folks prefer to buy their injection supplies in bulk. Here are some medical supplies stores our patients like to use:
For draw up
- 1 ml syringe with 18g 1 inch with needle attached
- 1 ml syringes (no needle)
- 18g 1 inch needle (no syringe) option #1
- 18g 1 inch needle (no syringe) option #2
For intramuscular (IM) injection
- 23g 1 inch needle (no syringe) option #1
- 23g 1 inch needle (no syringe) option #2
- 23g 1 inch needle (no syringe) option #3
For subcutaneous (subQ) injection
- 25g 5/8 inch needle (no syringe) option #1
- 25g 5/8 inch needle (no syringe) option #2
- 25g 5/8 inch needle (no syringe) option #3
You may also check to see if a syringe exchange program in your area can provide free injection supplies by visiting the North American Syringe Exchange Network map.
How do I dispose of used needles?
After you have finished your injection, it is important to safely dispose of the used injection supplies. Used injection supplies should be immediately placed in a sharps disposal container. FDA-approved sharps containers are generally available through pharmacies, medical supply companies, health care providers and online. They are made of puncture-resistant plastic with leak-resistant sides and bottoms and have a tight-fitting, puncture-resistant lid.
Never place loose needles and other sharps (those that are not placed in a sharps disposal container) in the household or public trash cans or recycling bins, and never flush them down the toilet. This puts trash and sewage workers, janitors, housekeepers, household members, and children at risk of being harmed.
If an FDA-cleared container is not available, a heavy-duty plastic household container, such as a laundry detergent container or bleach bottle, can be used as an alternative.
If you are a Plume member, we offer sharps containers for purchase through our partner mail-order pharmacy! Learn more here.
Have extra medication? Learn how to dispose of extra medication here.
If you’re new to self-injection, remember that confidence comes with time and practice. Whether you’re gathering your supplies, learning proper techniques, or figuring out where to buy what you need, remember to be patient and kind to yourself. Stay safe, stay informed, and happy injecting!
Join thousands of trans and non-binary folks getting expert gender-affirming care with Plume.